Tutorial · Azure
Generalize an Azure Virtual Machine to create a VM Image
How to create a custom image from an Azure virtual machine so that new VMs can be spun up with all the required software ready to go.
In this article9 sections
I often end up spinning up an Azure VM every time I need to do a quick PoC, and installing all the necessary software (IntelliJ, Git, etc.) to reduce the load on my laptop (the reluctance to close off the memory hogging Chrome tabs). We will see in this article how we can create a custom image that can then be spun up into a VM with all the software ready to go.
The steps are:
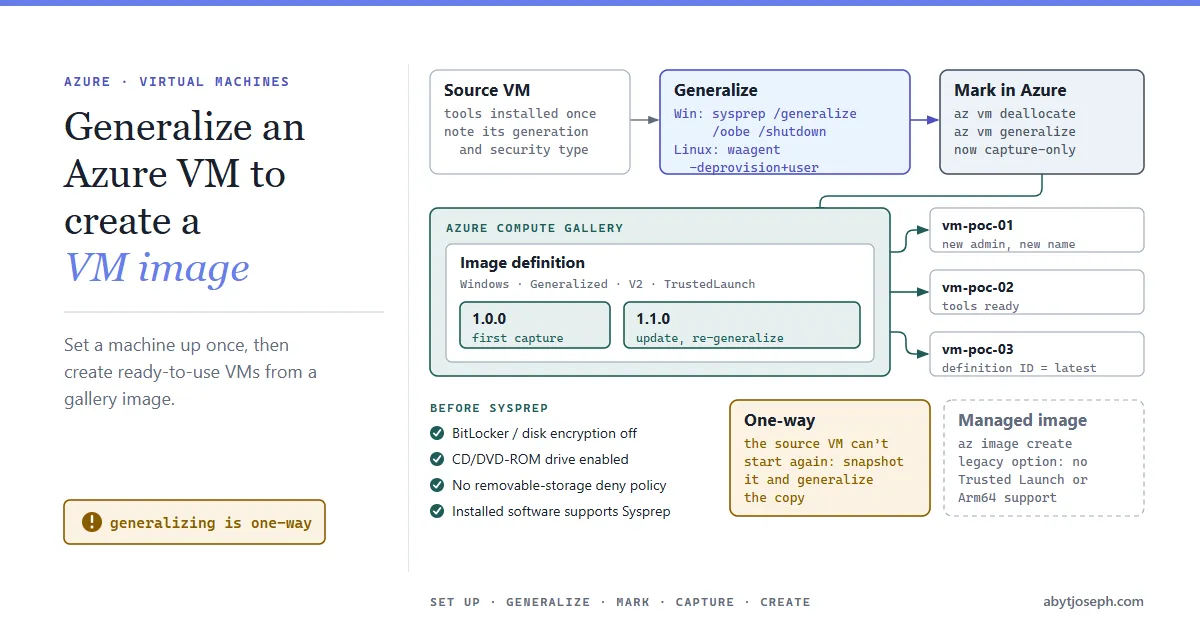
- Set up a VM the way you want it (software, settings, updates).
- Generalize it, so that the machine-specific details (computer name, user accounts, security IDs) are removed.
- Capture it as an image version in an Azure Compute Gallery.
- Create new VMs from that image whenever you need one.
Generalized or specialized?
Azure Compute Gallery accepts two kinds of image:
| Generalized | Specialized | |
|---|---|---|
| Machine-specific info | Removed (Sysprep / waagent) | Kept as is |
| User accounts | You set a new admin user when creating the VM | Same accounts and passwords as the source VM |
| Computer name | New for each VM | Same as the source VM |
| Use it for | Templates you create many VMs from | A quick copy of one machine |
This article covers the generalized route, which is the right one for a reusable “dev box” template. If you only ever want a copy of your own machine, a specialized image skips the Sysprep step: capture the VM and choose Specialized.
Before you start
These commands use the Azure CLI. Sign in with az login and select the right subscription with az account set --subscription <name or id> first.
Note two properties of the source VM. The image definition has to match them, otherwise the capture fails or VMs created from the image won’t boot:
$rg = "rg-poc-images"
$vmName = "vm-devbox"

# Security type: TrustedLaunch, ConfidentialVM, or Standard/empty
az vm show -g $rg -n $vmName --query "securityProfile.securityType" -o tsv

# Hyper-V generation of the OS disk: V1 or V2
$osDiskId = az vm show -g $rg -n $vmName --query "storageProfile.osDisk.managedDisk.id" -o tsv
az disk show --ids $osDiskId --query "hyperVGeneration" -o tsv
VMs created in the portal, CLI or PowerShell now default to Trusted Launch on Generation 2 (V2) images, so expect TrustedLaunch and V2 for most new VMs.
Generalize a Windows VM (Sysprep)
First check the things that commonly make Sysprep fail or leave new VMs stuck at the setup screen:
-
Encryption is off. Sysprep needs the drives fully decrypted, so turn off BitLocker / Azure Disk Encryption first. BitLocker can be on without you knowing on Windows 11 / Trusted Launch VMs, so run
manage-bde -status C:and confirm the drive is fully decrypted. -
The CD/DVD-ROM is enabled. Azure mounts an ISO to the DVD drive when it provisions a VM from a generalized image. If the drive is disabled, the new VM gets stuck at the out-of-box experience (OOBE).
reg add HKEY_LOCAL_MACHINE\SYSTEM\CurrentControlSet\Services\cdrom /v start /t REG_DWORD /d 1 /f -
No policy blocks removable storage. A policy such as All Removable Storage classes: Deny all access blocks the ISO Azure mounts, with the same result as a disabled DVD drive.
-
Installed software supports Sysprep. Most dev tools (IntelliJ, Git, VS Code, browsers) are fine. Some security agents, Store apps and server roles are not, or need extra steps. Check their documentation.
Then RDP into the VM, open a Command Prompt as administrator and run:
rd /s /q C:\Windows\Panther
cd %windir%\system32\sysprep
sysprep.exe /generalize /shutdown
Deleting C:\Windows\Panther clears logs from earlier Sysprep runs, which can make Sysprep fail. Sysprep then removes the machine-specific information and shuts the VM down. Don’t start the VM again. Wait until the portal shows it as Stopped.
Generalize a Linux VM (waagent)
On Linux the Azure Linux Agent does the same job. SSH into the VM and run:
sudo waagent -deprovision+userType y to confirm, then exit. The +user part also deletes the last provisioned user account and its home directory. Use plain -deprovision if you want to keep that account in the image, and add -force to skip the prompt. The command doesn’t guarantee that the image is cleared of all sensitive information, so check it yourself before you share the image.
Mark the VM as generalized in Azure
Sysprep and waagent only change the operating system. Azure still needs to be told that the VM is generalized. Deallocate it and mark it:
az vm deallocate -g $rg -n $vmName
az vm generalize -g $rg -n $vmName
From this point the VM can’t be started, only captured.
Capture the image into an Azure Compute Gallery
An Azure Compute Gallery (formerly Shared Image Gallery) holds your images. It has three levels:
- Gallery: the container.
- Image definition: what the image is (OS, generalized or specialized, VM generation, security type).
- Image version: the actual captured disk, numbered like
1.0.0. You create VMs from versions.
Create the gallery and an image definition that matches the VM you checked earlier:
$gallery = "galPocImages"
$imageDef = "devbox-win11"

az sig create -g $rg --gallery-name $gallery

az sig image-definition create `
  -g $rg `
  --gallery-name $gallery `
  --gallery-image-definition $imageDef `
  --publisher MyPoC --offer DevBox --sku win11 `
  --os-type Windows `
  --os-state Generalized `
  --hyper-v-generation V2 `
  --features SecurityType=TrustedLaunch
Use SecurityType=TrustedLaunch when the source VM’s security type is TrustedLaunch, and SecurityType=ConfidentialVM if it is ConfidentialVM. Leave out --features if the security type was empty or Standard. (TrustedLaunchSupported is for VHD, managed-image or gallery-version sources, not for capturing a Trusted Launch VM.) Use --hyper-v-generation V1 if the disk was V1. For a Linux VM use --os-type Linux.
Then capture the VM as version 1.0.0:
$vmId = az vm show -g $rg -n $vmName --query id -o tsv

az sig image-version create `
  -g $rg `
  --gallery-name $gallery `
  --gallery-image-definition $imageDef `
  --gallery-image-version 1.0.0 `
  --virtual-machine $vmId `
  --replica-count 1
This can take a while. By default the version is created and replicated in the resource group’s region. If your VM is in a different region from its resource group, add --location <vm region>. Add --target-regions to copy it to other regions too.
Spin up a VM from the custom image
Use the image definition ID to always get the latest version, or add /versions/1.0.0 to pin a specific one:
$imageDefId = az sig image-definition show `
  -g $rg --gallery-name $gallery --gallery-image-definition $imageDef `
  --query id -o tsv

az group create -n rg-poc-01 -l <region with the image version>

az vm create `
  -g rg-poc-01 `
  -n vm-poc-01 `
  --image $imageDefId `
  --security-type TrustedLaunch `
  --size Standard_D4s_v5 `
  --admin-username azureuser
Create the resource group in a region the image version is replicated to (see --target-regions). Leave out --security-type (or use Standard) if your image definition has no SecurityType feature. Without --admin-password, the CLI prompts for the password, so it doesn’t end up in your shell history. For a Windows image, az vm create also creates a public IP and opens RDP (3389) to the internet by default. For a PoC dev box, consider --nsg-rule NONE with Bastion or just-in-time access.
Because the image is generalized, you choose a new admin user and computer name for each VM. IntelliJ, Git and everything else installed before Sysprep are there when you sign in. In the portal, open the image definition and select Create VM.
When the tools need updating, create a VM from the image, update it, generalize it again and capture it as 1.1.0. New VMs pick up the latest version automatically.
What about managed images?
Older guides capture a managed image with az image create. It still works for generalized VMs, but Microsoft now calls it a legacy option. New features such as Trusted Launch and Arm64 are only supported through Azure Compute Gallery, and a managed image can’t be captured from a Trusted Launch VM. Use a gallery unless you have a reason not to.
Common issues
- The new VM is stuck at “Getting ready” / OOBE. The CD/DVD-ROM was disabled (or a policy blocked removable storage) when you ran Sysprep, or Sysprep didn’t finish. Fix it on a fresh copy and generalize again.
- Sysprep fails with “Sysprep was not able to validate your Windows installation”. Usually a Store app installed for one user, or an upgraded Windows install. Check
C:\Windows\System32\Sysprep\Panther\setupact.logfor the package name. - The image version fails because of a security type or generation mismatch. The image definition’s
--hyper-v-generationor--features SecurityTypedoesn’t match the source VM. An image definition’s generation and security type can’t be changed after it is created, so create a new one with the right values. - Starting the source VM fails with a “VM is generalized” error. Working as intended: a generalized VM can’t be started. Create a new VM from the image instead.
PS: Honestly, since exploring this option and using it a couple of times, I have regressed to using Azure Spot VMs and keeping the disk (Spot compute is much cheaper, though you still pay for the disk while the VM is deallocated, and Azure can evict it at any time). For my use that works better than keeping an image as well and paying its storage costs, because everything at the end just comes down to money! :)